As a Tech site and people who work with many types of devices, we have a rich experience on troubleshooting and sometimes repairing on our own, our equipment. So, in this article series, we will try to give you some tips and advice on how to check any issues that you might face and hopefully would help you.
Today’s article is about what to do, if your PC boots, but no VGA output is available.
Step One
The first step that you should take is to unplug the device from the power socket, and then replug it. Yes, sometimes is as simple as that. You can always try another wall socket or another cable (power or VGA, HDMI, DP cable, etc). If the problem persists, proceed to the next step.
Step Two
Unplug the device from the wall socket, remove the power cable and press the power button for about 30 seconds. It is always wise to remove any USB device or Peripherals that are plugged on your PC. Then try to power on your device with only a keyboard and a mouse on. If the device has now VGA output, plug carefully any peripherals you have. Check if the issue appears when you plug a particular device or in a particular port. Sometimes a device gets faulty and that may cause issues. If the problem persists, proceed to the next step.
Step Three
Repeat Step Two, but this time only with one stick of RAM on. You could try another RAM Module or another slot and see if the issue persists. Of course, if you have only one RAM stick, you should skip this step and proceed to Step Four.
Step Four
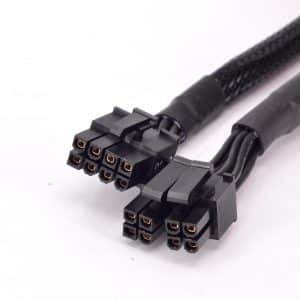
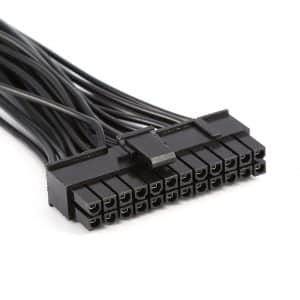
Repeat Step Two, and optionally the third. Now, unplug the connectors that are marked as CPU, Graphics Card connectors and the 24-pin Motherboard connector. If you have an older device, you might have a 20-pin connector, which is the same thing. Please, refer to the images for your convenience.

After several minutes, put them back on. In my experience most of the times this step, solves this issue. If it isn’t a faulty Hardware component issue, of course. Issue persists? Please, proceed to the final step.
Final Step
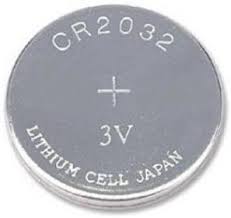
If everything else failed, this is the final step you should take. Repeat Step Two and optionally the third. Then try Clear CMOS. You can do that by your Motherboard’s jumpers (please refer to its manual) or simply by removing the battery of your device. Please, refer to the Battery Image for your convenience.
Hopefully, this step should do the trick. If not, then unfortunately, aren’t many things you can do, because it might be a faulty Hardware component. Usually it is a failing Motherboard or Graphics Card or even a PSU. If you have a Processor with Integrated Graphics you can check if you have display output by it. If this works, probably your Graphics Card has an issue and sadly might be dead. That possibly means you should buy a new one which is always a quite unpleasant surprise. Of course, you can always visit a Technician or your closest Repairing Store. It is always advisable to seek professional help, when we can’t solve something on our own.
Final Words
I hope that my article would help you in a situation like this. Some steps, are basically the same, in every troubleshooting method. There are more troubleshooting/repairing articles to come, so stay tuned. Quick Tips will be our article series, that we intend to be helpful for everyone. You can always suggest your tips, ask for assistance or Tech Support in our Forum or Discord Server. We will be more than happy to help you.