Privacy is a flaming matter these days. The more we rely on IoT to simplify our quality of life, the more we are exposed to third-party “eyes” without realizing it. Please, don’t let me be misunderstood. I don’t think that using technology is a bad thing. We need to be concerned about using technology more than we need to without knowing the consequences of overexposing. Still, there are things we can do to maximize our privacy level without sacrifices. Using wisely what we need and without unnecessary permissions is the first step.
Windows 10 and 11, among others (not only OSes), are known not to be the most privacy-friendly OSes. Of course, they are not the only ones. But this article is focused on the Windows side of things. Similarly, we can use the same technique for Linux and MacOS if we’d like to. Some of you might think I am referring to Firewalls. Yes, using a Firewall in the best possible way is one of the most important things. But it is not the only or even the most straightforward way. However, it is advised to tune your OS and Router’s Firewall as best as possible. But there is another way that you should be aware of, also. It might not be the best, but it still can do the job. Welcome to the Hosts File.
What is the Hosts File?
Before the DNS system was implemented, the Host File was used for network name resolution. Although it is considered a relic by today’s standards, it is still around and can do the job. At least for the one we need it to, even though it isn’t much of use in the modern Windows networking, as it used to be. All we need to do is know the service we would like to block (Wireshark might also be handy). Its typical format is:
(IP Address) (URL) #(Comment)
How to edit the Host File in Windows 10/11
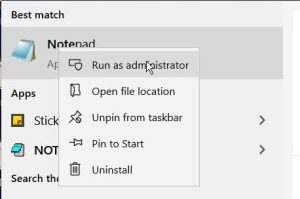
Locate the Windows “Notepad” and run it as administrator (right-click on the icon, “Run as administrator’).
 You should note that any notepad can do the job, but Windows Notepad is more than adequate. As a protected Windows file, it needs admin privileges to be accessed and modified. Choose “File” in the top left corner and “Open”. Change the file extension settings on the right from “Text documents (*.txt) to “All files (*.*). Find the location below:
C:\Windows\System32\drivers\etc
Locate the “hosts” file and click it. Now, you should have access to the Hosts File. You can modify it however you wish to if you have the correct argument. One of the things you would like to change probably is Windows Spying Services. Hopefully, you don’t need to search for too long. The PC Security Channel provided some of them in this YouTube video guide. The following Domains were added:
127.0.0.1 localhost
::1 localhost
127.0.0.1 data.microsoft.com
127.0.0.1 msftconnecttest.com
127.0.0.1 azureedge.net
127.0.0.1 activity.windows.com
127.0.0.1 bingapis.com
127.0.0.1 msedge.net
127.0.0.1 assets.msn.com
127.0.0.1 scorecardresearch.com
127.0.0.1 edge.microsoft.com
127.0.0.1 data.msn.com
That’s it. You can rest assured that you have limited data exposure to Microsoft and its third-party vendors/ services/ Servers—a small win, but still a win. Be sure to add any other Domain you would like to, of any type, not only by Microsoft but don’t overreact. Small, safe steps. It is advisable to back up the original Hosts File if something goes wrong. As always, stay safe, and stay in the know! Be sure also to check the rest of our Quick Tips article series.

Nice artcicle again!
Thanx very much, Harris!